There are so many reasons to consider adding a digital option to your Tpt products! Maybe you've had a Tpt store for a while and are looking for a way to increase the value or your products and revamp some of your best sellers or add a little boost to your store. Digital components to already existing products can be the perfect way to do this!
Let's check some of the top reasons to add a digital option to your print products out!
Reach more students AND teachers by making your products more versatile! By adding a digital option, it opens the resource up to a buyer who might only be able to use it digitally.
Teachers love having a choice on how to use your resource. Some might chose print, some might chose digital, and some might differentiate with BOTH! No matter how they use it, they'll love having the choice and freedom to decide what works best with their students.
AKA- raise the price! Once you add a digital option to your resources, you've added an immense amount of value because teachers can now choose how they use it! They have options, and can most likely use it in different ways to differentiate with their students. This means you can increase the price!
In a recent poll on Instagram, 90% of teachers said they are more likely to buy a resource on Tpt with both print & digital options. (9% said they only buy digital! And 0% said they only buy print!). Even after the pandemic, digital resources are still highly sought after because they are versatile, easy to use, save paper, allow students to really show what they know & take ownership of their learning, and the list goes on!
Confidently know that your resources are meeting the needs of more teachers and students by adding a digital option. A digital option might include a Google Slides resource, and interactive self checking PDF, a Seesaw option, or even a video or form for students to complete! The possibilities are endless!
There are SO many reasons to start adding digital components to your products and resources. What's stopping you!?
And if you're curious about how to get started, you can download the FREE step-by-step guide to walk you through how to begin converting your print products to digital!
I lovvvveeeeee getting students started on Seesaw at the beginning of the year.
There's something about that fresh portfolio and a fresh start with all the possibilities ahead.
One of the first things I do to increase engagement and buy-in (not that students really need it because every student I've ever worked with has LOVED Seesaw right off the bat!) is allow my students to choose their icon or avatar in Seesaw.
In Seesaw, there are three options for students - their initials, an emoji, or their photo.
In the younger grades, one of the first things I would do is print out all of the emoji options. This alone was exciting for students. I would have them circle their favorite, then I would change their emoji to their favorite! This is a quick and easy way to get students EXCITED about showing their learning. They flip out when they see their emoji! Works every single time!
Here are step-by-step directions to change student icons in Seesaw.
As the year goes on, I like to add a prize box option for students to be able to change their emoji in Seesaw and use it as an incentive. They love this and it's FREE and easy for me!
While talking with some teacher friends this summer and discussing activities we'd like to incorporate in our classrooms this upcoming school year, scoots came up. Here's a different twist if you have access to devices and Seesaw. If you're interested in getting started with Seesaw, make sure to check out THIS POST!
A quick note before I go into explaining how I use Seesaw for scoot activities in my classroom. The purpose of using Seesaw for Scoot activities is NOT to go paperless. Instead, it's to make student thinking visible. I can see student thinking when they are talking through their work using the Drawing tool in Seesaw. It may take a little longer, but I'd rather have one Seesaw upload where I can SEE what's going on in the student's head and where I can fill in gaps vs. having a worksheet with 25 answers on it that don't really show me student misconceptions. I am NOT using Seesaw to take a photo of the recording sheet, push it out to students, and have students record there answers on the digital recording sheet. (There's nothing wrong with this at all! I'm just going to explain a different way to use Seesaw and make student thinking visible here!)
I should also note, I also use a REGULAR recording sheet for scoot activities (I'll explain those below too!! It just depends on what we're working on and what I'd like my students to accomplish. So sometimes it's pencil/paper, sometimes it's Seesaw!
Review ANY content! Scoots can be used for any content area review.
Use a scoot activity as an assessment to see where students are. Scoots are always more fun that a boring old pencil/paper/at your desk/don't talk assessment.
Scoots can be collaborative if you'd like them to be. Students can work in partnerships, or even in groups on tasks.
Scoots can be easily differentiated. For example, I might have three groups of students, one at grade level, one approaching, and one below.
Scoots can be used as a center activity. The prep is relatively easy and once students know how to do them, you can switch out the content so they don't get bored.
And my all time favorite reason to use scoot activities- MOVEMENT! Scoots get kids up and moving which can be a game changer. It brings the content to life a little more, and gets kids engaged. Especially if you "hide" ;) the task cards! It almost adds the element of a scavenger hunt to the mix when we "hide" them!
And of course, if you're using Seesaw, it'll make STUDENT THINKING VISIBLE!
Task cards. These can be ANYTHING really! Math flash cards, word problems, pictures for vocabulary, or ANYTHING you are working on with your students! Label each card with a number to correspond to the recording sheet. You can find LOTS of these on Teachers Pay Teachers if you search for a skill + scoot. (ex. Addition Scoot)
Recording sheet. Students each need a recording sheet. This usually looks like a grid or table with numbers (one number for each task card.) When I'm not using Seesaw, I always have kids put these on a clipboard so they can easily walk around the classroom and record their thinking. If you're using Seesaw, Seesaw will actually be your recording "sheet" and you won't have to actually prep anything for students- just the task cards.
Now you can do this in lots of different ways! That's the beauty of it! Do what works for you and your students! I'll explain two ways below!
Option 1 (This is usually how I do it! I like this option because students can do it over time and there's no need to finish in a set amount of days or time. Students are also able to work on this independently or in groups!)
1. Hang your task cards up around the classroom. I always tell the kids I've "hidden" them (they're NOT hidden. At all. I just say that and it adds to the motivation and excitement!)
2. Teach students how to walk around the classroom quietly and match the problem with the spot on the recording sheet. For example, if a student finds card #5, they would place their answer or response to card #5 in box #5 on the recording sheet.
3. Students continue to walk around and complete activities or problems.
4. If they finish early, I always tell them to see if any friends need help.
If you want to use Seesaw for this (instead of a regular pencil/paper Recording Sheet), students will:
1. Find a task card.
2. Press the green plus sign in Seesaw.
3. Choose the Drawing tool or Photo tool (depending on the task card. If it's a math problem, you'll probably want them to choose the Drawing tool to show their work. If it's a vocabulary card, you might want them to take a photo of the card then use Seesaw to explain the word and use it in a sentence.)
4. Use the Text tool or the Pencil tool to add the number of the task card. *Make sure to explicitly state this!!!!
5. Press Record and complete the problem or task.
6. Upload your work with the green check mark.
Here's a quick video on how to use the Drawing tool to complete a task during a scoot.
And here's a quick video on how to use the Photo tool to complete a task during a scoot.
Option 2 (This is a more fast paced option)
1. Students each place a task card at their desk.
2. Decide on a set amount of time for each problem (anywhere between 30 seconds to 2 or 3 minutes depending on the task and how much time students might need to complete it).
3. Start the timer. Students begin working on their problem at their desk.
4. When the timer goes off, students "scoot" clockwise (or counterclockwise- whatever you want. Just make sure to teach students how to do this first!) to the next task card and begin working on that one.
5. Make sure to explicitly teach and remind students how to match the problem with the spot on the recording sheet.
OR, if you'd like to use Seesaw...
1. Students each place a task card at their desk.
2. Decide on a set amount of time for each problem (anywhere between 30 seconds to 2 or 3 minutes depending on the task and how much time students might need to complete it).
3. Students begin a new upload in Seesaw (green plus sign, and either Photo tool or Drawing tool). Explicity teach students how to add the number of the task card to the upload using the Drawing tool or Text Label tool.
3. Start the timer. Students begin working on their problem and recording their thinking.
4. When the timer goes off, students upload their work (green check mark), and "scoot" clockwise (or counterclockwise- whatever you want. Just make sure to teach students how to do this first!) to the next task card and begin working on that one. (Start back at #3.)
5. Make sure to explicitly teach and remind students to add the number of the task card onto the Seesaw upload using the Drawing tool or Text Label tool.
Assessment time in the classroom. Every teacher's favorite. JK. We became teachers to TEACH, right? Not assess! But it's something we have to do, and many districts mandate specific assessments at certain times of the year. Not to mention, it's good to have something tangible and some legit data to share with parents and while doing report cards.
This is where Seesaw comes in, and can be a serious game changer for administering, reading, and document student assessments in the classroom.
Seesaw is a Digital Learning Portfolio for students. I feel funny typing that, because it's truly SO much more, and has the ability to help you flip your classroom, to create a student centered classroom, to break down the walls of your classroom to connect with other classes around the world, to allow your students to connect with each other and their families which gives them an authentic audience, to turn your students into bloggers, and SO. Much. More! You'll see samples throughout this post!
I guess this should be titled WHY NOT!? If you have access to any number of devices in your classroom, EVEN if you're not 1:1, Seesaw can still be a game changer when it comes to administering, evaluating, and grading assessments.
By allowing students to work through assessments in Seesaw, it saves me the time of having to pull students one on one, and sucking up a ton of teaching time. I can assign an Activity in Seesaw, or have students move through a center in which one of the centers is an assessment challenge. By using Seesaw, it captures that specific moment in time. Now I don't have to sit one-on-one with every single student, because I can have them working simultaneously on assessment challenges, then I can revisit them at a later time! This is a game changer for sure.
I can easily differentiate assessments in Seesaw too. I can assign students the same task in Seesaw, but I can differentiate the problems and content depending on my students and their needs. Below is an example I've used in math. I needed to know if students understood how to add with regrouping. I had three groups of students- one below grade level (Group 1), one at grade level (Group 2), and one above grade level (Group 3). Each student was assigned a group, and knew which assessment Challenge to complete to show their understanding of the concept. The great thing about this is after I reviewed the work, if I noticed a student who did really well on their challenge, I may have him/her try the next problem. Same concept, just differentiated with different problems.
The samples that students produce in Seesaw make student thinking VISIBLE! That moment in time and whatever that students knows is captured in Seesaw. And I can revisit it ANYTIME. Even from the comfort of my couch at home!
Seesaw can also be a HUGE help during parent-teacher conferences. Instead of saying, "Yes, little Billy is doing great!" and smiling, I have EVIDENCE of little Billy's thinking to share with parents through Seesaw. And vice versa... I know I've never been in meetings with parents where they say, "Joey is so good at reading at home. I don't know why he acts like he can't read with you..." #yeahright With Seesaw, I have evidence of the thinking and learning happening in the classroom.
I decide on the content I place in each Challenge, and they can be used over and over, across content areas.
There are so many ways to assign these challenges too!
Hang them up around the classroom and have students move through them at their own pace, like a Scoot activity.
Use them as an exit ticket.
Have them at a center for students to complete.
Have students work on them with a partner or in a collaborative group.
Have a parent volunteer work with students on these.
If your students take devices home, they could work on them at home.
Have students work on them at the teacher table during group time.
Use them as early finisher activities.
Just like everything else in Seesaw, the possibilitie are endless!
Don't forget- it doesn't have to be fancy. It can be as simple as a student taking a photo of something they've completed, and using the recording tool to reflect and explain.
If you only have a few devices and your students are sharing devices, using Seesaw to give assessments will still work! Seesaw makes it so easy to move between students (the iPad is signed in to the class one time, and anytime a student clicks the upload button (green plus sign), it will have the student choose his or her name from a list). The devices and assessment activities can be placed at a center, where students work through them in small groups. You might place the assessment Challenges at the teacher table and work with students through them together (or independently while you're sitting there with them). If you have access to a parent volunteer, this might be another option! Have the parent volunteer call students over one at a time to complete the assessment challenge. Having the parent there can be helpful because the volunteer can keep students on task, read directions, and help students troubleshoot and answer questions.
In Seesaw, you have the option to allow students to see each other's work (IF you want), and families to see work their students have uploaded (IF you want). Since these are assessments we're talking about, you may or may not want to share them with other students and parents. If you have Family Access Enabled, or if you are allowing students to view each other's work, this is not a problem. Simply make sure that all posts must be Approved before posting (Settings, Students, New items require approval.)
Once the students have uploaded their assessment to Seesaw, you will be required to approve it before any other students or parents can view it. Simply do not approve these assessments. The work will remain in the student journal, and you will still be able to access the work at any time- it just will not be visible for other students or parents to see until you approve it.
Ready to get started with Seesaw? Check out THIS post!
This is always a favorite project to do with students (both for teachers and students!) because it lends itself perfectly to creativity and there are lots of different ways you could go with it. The possibilities for writing, evaluating, forming an opinion, and learning more about your students are truly endless with this project. And administrators- this would even be a fun project to completed with your staff! Check it out!
Projects like these allow our students to be creative. It gives them choice in their learning (in the quote they choose, and the actual creation of their project) and students feel a sense of pride in their work. No projects will turn out exactly alike, even if students choose the same quote.
The critical thinking component is apparent when we ask students to evaluate the quote they've chosen and to dig a little deeper into it's meaning. We can also ask students to make connections to the quote, and write a narrative about how the quote impacts them and why they chose it. The possibilities with this project are truly endless.
Scan the QR codes to explore inspirational quotes. Find one that really stands out to you and speaks to you. Write your quote down. Make sure to cite where the quote came from, and take note of who said the quote. (Teachers- this is a great lesson on citation!)
Take a selfie or have a friend take a picture for you.
Make sure to pay attention to the background (plain, solid backgrounds work the best for this project) and leave some space, somewhere for your quote. (You don't want your quote to be covering your face!)
Launch an app that allows you to layer Photos and Text. Pic Collage, Seesaw, Google Slides, or Phonto are some on my favorites.
Add your quote to your photo. Have fun stylizing and editing. Just make sure your quote is easy to read for others (you can always go back and make a fancy hard-to-read one if you want later)!
Don't forget to save your quote project to your device.
Here's a quick video on how to do this with PicCollage EDU. (Teachers- the difference between PicCollage and PicCollage EDU is that EDU has no social sharing options, there are no ads, and no accounts are required. Read more here.)
Feel free to share this video with your students as well- it's a step by step video.
Now that students have created these beautiful inspirational quote projects, the big question to ask is- What will you do with them now? Print them out? Hang them on your wall? It surely would make a nice bulletin board! Turn them in to Google Classroom? But then what?
But how do we take it one step further?
How are we sharing student work with the world to inspire others?
Twitter? A class blog? Class Instagram account? Seesaw?
Print them out to hang around the school and inspire other students?
I challenge you to make sure you aren't missing this last step, because it oftentimes gets overlooked, and it may possibly be the most important and motivating step for our students. Giving students an audience for their work is essential.
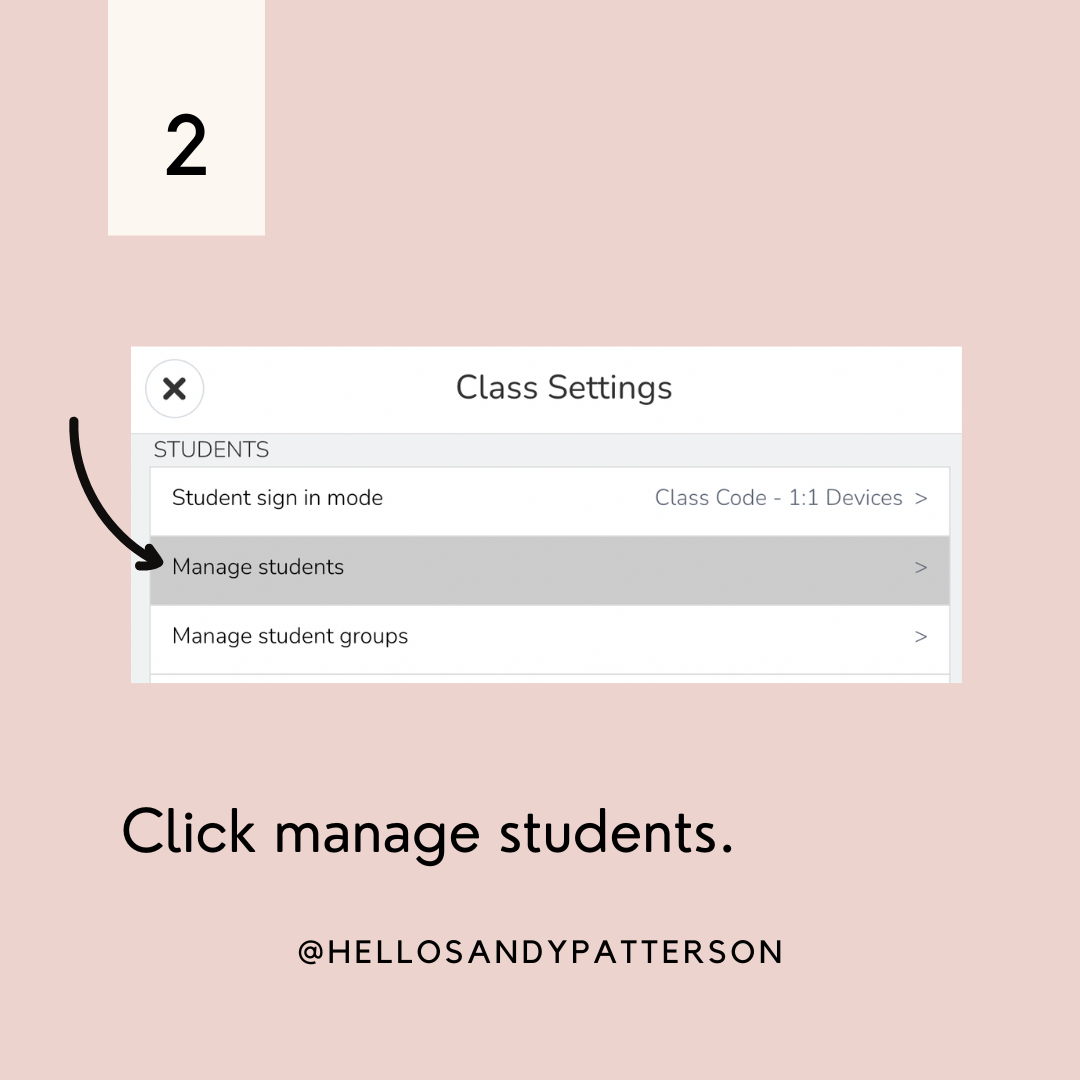
Have you heard about Seesaw? Are you wondering how to get started? I'm here to help you and your students!
Seesaw is a Digital Learning Portfolio for students. I feel funny typing that, because it's truly SO much more, and has the ability to help you flip your classroom, to create a student centered classroom, to break down the walls of your classroom to connect with other classes around the world, to allow your students to connect with each other and their families which gives them an audience, to turn your students into bloggers, and SO. Much. More!
First, you'll want to decide on the Settings for your class in Seesaw. Check out this video to get started.
If you're ready to get started, first you'll download the Getting Started Challenges for your students here. These Challenges are designed to get you and your students familiar with the upload tools in Seesaw. This is how the students upload their awesome work to their learning journal! Once you're familiar with these, the possibilities for you and your students are truly endless!
Next, watch these videos. There's one video for each challenge, and the video will walk you through each challenge in Seesaw. I would suggest running through each Challenge on your own before you show your students, and complete the Challenges yourself. You can even do this along with the videos! This way, when you introduce the challenge to your students, you'll have some background knowledge and a better understanding of how Seesaw works! (Don't worry- these videos are all super short and under five minutes!)
Challenge #1
Challenge #2
Challenge #3
Challenge #4
Challenge #5
Challenge #6 (This is if you and your students are using G-Suite apps in your classroom).
You might also be interested in learning how to create Folders in Seesaw to keep the Challenges organized!
Now you're ready to introduce the Challenges to your students.
You can introduce the Challenges one at a time with your students. I've found this works well for younger students- I model, then they try it out. Then I introduce another challenge, model it, they do, etc. until they've gotten through all of them.
For older students, they don't tend to need as much scaffolding, so
I also post Instagram stories on Seesaw often (that's where all of those videos came from!) so make sure to stop by and say hi there!
You can also stop by my YouTube page where I upload the Seesaw videos as well!
Do you have questions? Ideas? Please leave a comment! I'd love to hear how you are using Seesaw in your classroom! And if you're not, I'd love to help you get started! Just let me know how!
We all know that research is unclear on the benefits of homework. Does it really help kids? Does it create even more of a divide between socioeconimical classes? Is it really worth it? Are you giving meaningful feedback on all homework you assign? Are students actually learning anything from doing it?
I just started reading Ditch that Homework by Matt Miller and Alice Keeler and I cannot agree more with their points about getting rid of homework. They bring up points about equity for all students (since not all of our students have the same resources and help available at home), stress and family fighting (because homework can be a huge cause of this- have you experienced it with your own kids???), academic benefits being minimal, cheating (have you ever had a student turn in a homework assignment completed in a parent's handwriting...???), homework being difficult to truly differentiate, and finally how it can reduce the love of learning.
The idea behind the FlipGrid Family Book Club is to STOP assigning pointless homework (I'm guilty of this too if we're being totally honest!) and to get students and families (near and far!) READING together!
How wonderful would it to be actually have students reading awesome books, involve families (even if they live hundreds of miles away) in the reading, and have an authentic conversation about the text!?!?
FlipGrid makes this possible!
Have you used FlipGrid before!?!?! It's a website that allows teachers to create "grids" of short discussion-style questions that students respond to through recorded videos. Each grid is basically a message board where teachers can pose a question and students can post video responses that appear in a tiled grid display like this:
(Click to see this first grade class' responses! They used ChatterPix to share the author's purpose after reading I'll Wait, Mr. Panda.)
Here's how to set this project up!
Choose a book and make sure all of your students have access to the book. It can be any book. Chapter books will work best, but for younger students it could be picture books. You could even do an author study throughout the month. For example, "In April our author study will be in Peter Reynolds. Week 1 we'll be reading The Dot. Week 2 we'll be reading Ish. Etc."
Break the book up into sections and decide which chapters (or books) you will read each week. I've found it's easier and more manageable to do "chunks" per week. For example, Week 1 read Chapters 1-5. Week 2 read Chapters 6-11. etc. vs. Read Chapter 1 on Monday, Read Chapter 2 on Tuesday, etc. This allows for more flexibility on the family and student's parts.
Create a FlipGrid Grid.
Create one Topic on your Grid per "chunk" of the book.
You're going to repeat this last step step for each "chunk" of the book. I have broken the book into five chunks, so I'll be creating five topics for the grid!
Create a calendar. Include the chapters to read, and your Grid/Topic codes from FlipGrid.
(Click to download the editable calendar.)
Send the calendar and Family Info sheet home with families and students. Encourage families to invite out-of-town family members, siblings, and anyone else! The more the merrier!c
(Click to download Family Directions)
Here's what will happen when students and families begin responding.
Assign this as student homework, make it an optional activity, or it can even be more flexible if you'd like. It can be a class read aloud, and students can respond to the FlipGrid at a center or as an early finisher activity. The key is to get families involved, to get students excited about reading, and to get families talking about the reading WITH students!!! It would even be fun to invite administration, principals, board members, the student's previous teachers from past years, and anyone else you can think of! Why not even open it up to the entire school?
Then read and respond!!!
If you're interested in reading and responding to the Wild Robot, we'd love to have you and your class contribute to the Wild Robot Grid! Feel free to use these codes with your students to add their responses!
(Click to download this calendar to participate in this Wild Robot discussion with your students.)
***Please note! This is a PUBLIC grid. Please make sure to check your district's acceptable use policy in order to ensure students have permission to participate and post. DO NOT allow students to post their name with their video response on this grid. I suggest using the teacher's name, or responding as a class. This is to ensure student privacy and safety. Any posts with student names will be deleted.***
Do you use FlipGrid in your classroom?! I'd love to hear about it!


